Multi Site Manager
Multi Site Manager (MSM) enables us to easily manage multiple web sites that share common content. MSM lets you define relations between the sites so that content changes in one site are automatically replicated in other sites.
MSM reduces the time it takes to manage us websites and increases the re-use of common content:
- Efficiently manage different language versions of a website.
- Automatically update one or more sites based on a source site:
- Enforce a common base structure and use common content across multiple sites.
- Maximize the use of available resources.
- Focus efforts on managing the content that differs between the sites.
- Maintain a common look and feel.
Interview Questions
Note: For more on Multi Site Manager check this video
Blueprints target the rollout of complete multilingual website projects and are a tool to control multiple rollout configs and live copies. Blueprints allow you to control multiple live copies and centrally consistent rollout configs for the blueprint's live copies. A blueprint rollout will push modifications to all it's live copies.The default Blueprint Template assumes that the source web site has the following characteristics:
- The web site has a root page.
- The immediate child pages of the root are language branches of the web site. The Name of each page is a language code. When creating a Live Copy, the languages are presented as optional content to include in the copy.
- Each language page contains one or more child pages. When creating a Live Copy, child pages are presented as a chapter that you can include in the copy.
- 1. Open the Tools console.
- 2. Select Tools, then MSM Control Center. Click New... in the top-middle toolbar.
- 3. In the Create Page dialog, define the blueprint:
- Title, the page title,
- Name, the page (node) name
- Select the Blueprint Template
- 4. Open the newly created page and click the Edit button beside Settings.
- 5. In the Blueprint Settings dialog, define the blueprint:
- Name, the blueprint name that was defined earlier can be changed.
- Description, e.g. This is my blueprint
- Source Path: set the path of the blueprint, e.g. /content/geometrixx
- Thumbnail Image (optional): this thumbnail will appear in the live copy creation.
Live Copy is the creation of a new site based on the content and structure of an existing site. Changes or additions to the main site can then cascade down throughout Live Copies. When used to its full potential, this is a very powerful tool that can simplify management across a large number of sites with little effort.
Create a Live Copy of any page and its child pages, or of a single page. When you create the Live Copy, you can optionally specify the rollout configurations to use for automatically updating the content:
- The selected rollout configurations apply to all of the Live Copy pages that are created for the source page and its child pages.
- If you specify no rollout configurations, either the system default rollout configuration is used, or the default rollout configuration for the branch is used.
The following procedure creates a Live Copy using the classic UI.
- 1. Open the Websites console.
- 2. Select the folder or page below which you want to locate the Live Copy pages.
- 3. Click New > New Live Copy.
- 4. In the Source selection tab, define the Live Copy:
- Title: The title of the root Live Copy page
- Name: The name of the page node
- Live Copy From: Browse to select the page to use as the source of the Live Copy
- Exclude sub pages: Select this option to exclude the child pages from the Live Copy.
- 5. On the Sync config tab, specify one or more Rollout Configs to use for the Live Copy
- 6. Click Create.
There are some rollout configurations are installed by default in AEM . e.g Standard rollout config, Activate on Blueprint activation, Deactivate on Blueprint deactivation, Push on modify more
We need to create a rollout configuration when the installed rollout configurations do not meet your application requirements.
Create the rollout configuration, then add the trigger and synchronazion actions. The new rollout configuration is available when setting rollout configurations on a blueprint or on a Live Copy page
CREATE ROLLOUT CONFIGURATIONS
- 1. Go to the Tools console
- 2. In the folder tree, select the Tools/MSM/Rollout Configurations folder.
- 3. Click New > New Page and provide values for the Rollout Configuration properties:
- Title: The title of the Rollout Configuration, such as My Rollout Configuration
- Name: The name of the node that stores the property values, such as myrolloutconfig
- Select RolloutConfig Template.
- 4. Click Create.
- 5. Open the rollout configuration that you created.
- 6. Click Edit.
- 7. In the Rollout Config dialog, use the Sync Trigger drop-down menu to select the action that causes the rollout to occur.
- 8. Click OK to save the changes.
PROCEDURE TO ADD SYNCHRONIZATION ACTIONS TO THE ROLLOUT CONFIGURATIONS
- 1. Open CRXDE Lite.
- 2. Select the jcr:content node below your rollout configuration node. For example, for the rollout configuration with the Name property of myrolloutconfig, select the /etc/msm/rolloutconfigs/myrolloutconfig/jcr:content node.
- 3. Click Create > Create Node, configure the following node properties and click OK:
- Name: The node name of the synchronization action. The name must be the same as teh Action Name in the table Synchronisation Actions, for example contentCopy, or workflow
- Type: cq:LiveSyncAction
- 4. Select the action node that you created and add the following property to the node:
- Name: The property name of the action. The name must be the same as the Property Name in the table Synchronisation Actions, for example enabled
- Type: String
- Value, the property value of the action. For valid values, see the Property Value column in Synchronisation Actions, for example true.
- 5. Add and configure as many syncronization action nodes as you require. Rearrange the action nodes so that their order matches the order in which you want them to occur. The topmost action node occurs first.
- 6. Click Save All.
- CQ MSM Content Copy Action
- CQ MSM Content Delete Action
- CQ MSM Content Update Action
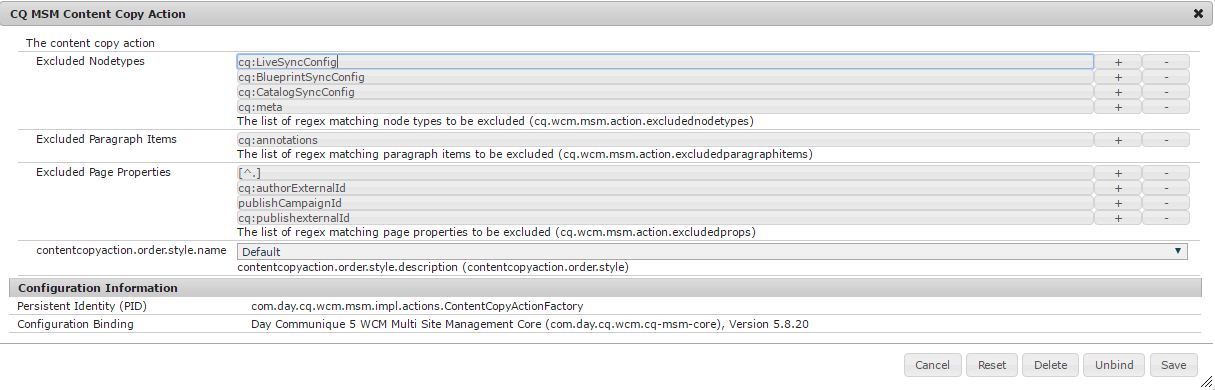
- Excluded Nodetypes - The list of regex matching node types to be excluded.
- Excluded Paragraph Items - The list of regex matching paragraph items to be excluded
- Excluded Page Properties - The list of regex matching page properties to be excluded
Multi Site Manager (MSM) allows us to create copy of existing site and automatically update the copy when changes are done to the source site. Multi Site Manager (MSM) enables us to easily manage multiple web sites that share common content. We should use MSM when our website is :
- Multinational Site - Sites are in multiple countries
- Multilingual Site - Sites are in multiple languages.
- Multinational Multilingual Site - Sites are in multiple countries and in multiple languages
To use MSM for managing language versions of a website, our website must use the following structure:
- The web site has a single page as the root.
- Each child page is the root page of each language version.
- The name of the child page is the language code.
Procedure to add a language version of a web site using the Language Copy tool
- 1. Go to website console.(http://host:port/siteadmin#)
- 2. Select the root page of the site. (eg. Geometrixx Media)
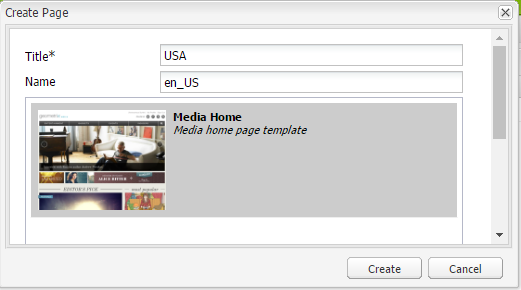
- 3. Add a new child page that represetns the language version of the site:
- a. Click New > New Page.
- b. In the dialog, specify the Title and the Name.
Name should be in the format ofor _ . example en, fr, en_US. - The supported language code is lower-case, two-letter code as defined by ISO-639-1
- The supported country code is lower-case or upper-case, two-letter code as defined by ISO 3166
- Select the Template and click Create
- 4. Again select the root page of the site.
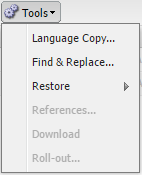
- 5. In the tool menu, select language copy.
- 6. The Language Copy dialog displays a matrix of available language versions and web pages. An x in a language column means that the page is available in that language.
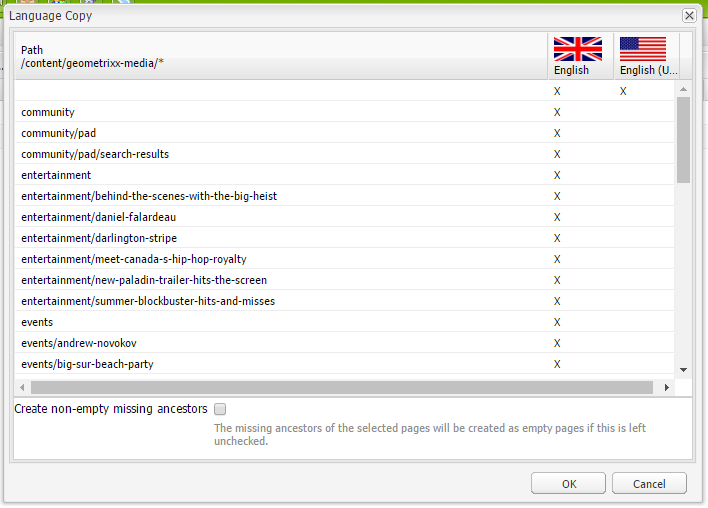
- 7. To copy an existing page or page tree to a language version, select the cell for that page in the language column. Click the arrow and select the type of copy to create.
- auto - Uses the behavior from parent pages
- ignore - Does not create a copy of this page and its children
- < language>+ (e.g. English+) - Copies the page and all its children from that language
- < language> (e.g. English) - Copies only the page from that language
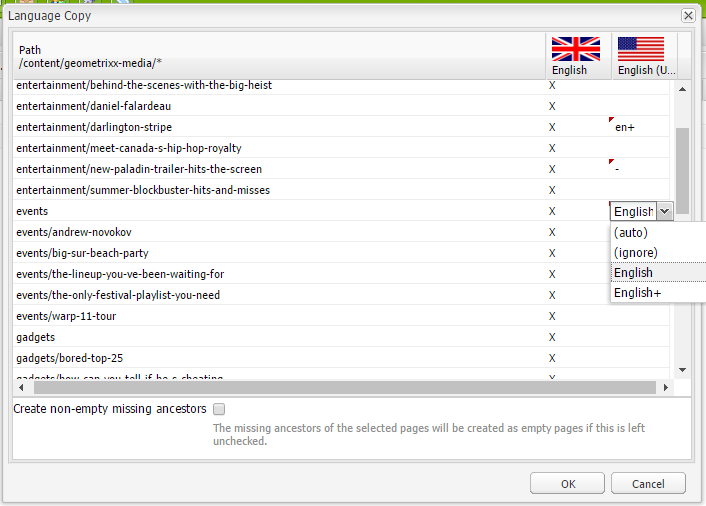
There is a check box option at the bottom of the dialog:
Create non-empty missing ancestors - The missing ancestors of the selected pages will be created as empty pages if this is left unchecked. - 8. Click OK to close the dialog.
- 9. In the next dialog, click Yes to confirm the copy.
Procedure to modify the languages
- 1. Open CRXDE Lite (http://host:port/crx/de/index.jsp)
- 2. Select the /apps folder and click Create > Create Folder. Name the folder wcm.
- 3. Repeat the previous step to create the /apps/wcm/core folder tree. Create a node of type sling:Folder in core called resources.
- 4. Right-click the /libs/wcm/core/resources/languages node and click Copy. Right-click the /apps/wcm/core/resources folder and click Paste.
- 5. Each child node of languages node represents a language or a language-country:
- The name of the node is the languge code (such as en or hi), or the language_country code (such as en_us or de_ch).
- The language property of the node stores the full name of the language for the code.
- The country property of the node stores the full name of the country for the code.
- When the node name consists only of a language code (such as en), the country property is *, and an additional defaultCountry property stores the code of the language-country to indicate the country to use.
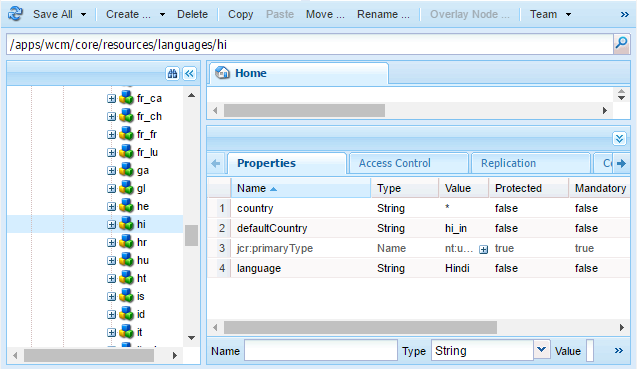
- Modify the child nodes as required.
- Click Save All.
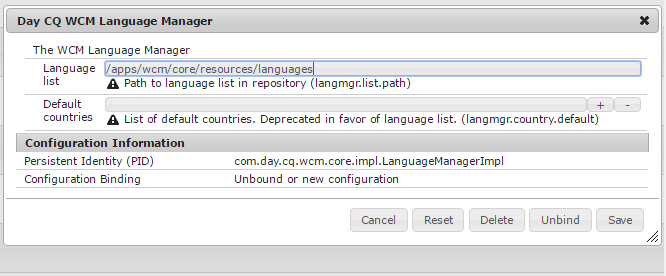
- Go to OSGI console. Click configuration
- Open the CQ WCM Language Manager.(http://host:port/system/console/configMgr/com.day.cq.wcm.core.impl.LanguageManagerImpl)
- Locate and click Day CQ WCM Language Manager, and change the value of Language List to /apps/wcm/core/resources/languages, then click Save.